For Jedi's 6th birthday we threw him a Star Wars party. My husband and older son jumped right in and were excited to help plan the games, make the sabers, etc. I definitely could not have do it without their help (as my insanity level would have reached an all-time high, while my sanity level plummeted to it's lowest)
Here is the skinny on the party. I'll go into details on things that will help you if you too are planning a Star Wars party. Or perhaps it will convince you that it is far too much work, and a movie party at the local theater sounds PERFECT! :)
I got most of my inspiration from reading this post.
Preparations.
My most ambitious task was making an R2D2 cake. Not having much experience with fondant, and wanting it to be 3D, didn't help me much.
I started with a board and dowel at an angle hoping to make it like the Sharper Image R2 that we have. I decided to make the body out of Rice Krispie treats, and the top part out of cake.
Here are my shattered dreams:


So then we switched to just having him sit on the board, and ended up with this:


Not too shabby. I'm showing you my grand plans for a stand up R2, so those of you with more talent than I can use my mistakes as a jumping block. I'd love to see you link up to my post if you've successfully accomplished it!!
Light Sabers were made with 1/2 inch PVC pipe cut in 2 1/2 foot sections. Then we cut pool noodles in half and put them over the PVC. It was a nice snug fit. Then electrical tap was added at the handles in different color combinations so the kids were know which was theirs.

Death Star Pinata!!
Okay this was also a bit more ambitious than it should have been. Mostly because I over estimated the strength of the kids that would be at the party. We didn't use light sabers to break the pinata. We decided to use a PVC pipe with silver duct tape covering it. The foam from the noodles would break if it was used for the pinata.
I used a round ball from Target- the big colorful balls that you find in those large cage-bins. Then I got started using homemade paper mache glue. I alternated between newspaper and cardstock. Ten layers. Let me just say this was overkill. You'll see why. I would recommend 5 layers.

I put the candy in it, then sealed it up with a bowl shape I also made from paper mache. I used a bowl that seem like the right shape for the death star dip, then put 5-6 layers on it. I cut the hole out of the ball, removed the real ball, and placed the candy in. Then I hot glued the paper mache bowl in, and added more paper mache layers to make it blend in with the rest of the ball.
Then I painted the whole thing with silver spray paint. Next I used tape to make all the lines on the ball. I stared pretty precise, but it somehow got off track and no one would ever notice. (if you do, you're looking too hard. Its a pinata for pity's sake)


This is post beating. My 14 year old son beat it a dozen times and the bowl finally popped out allowing the candy to be dumped out. Definitely too many layers. :)

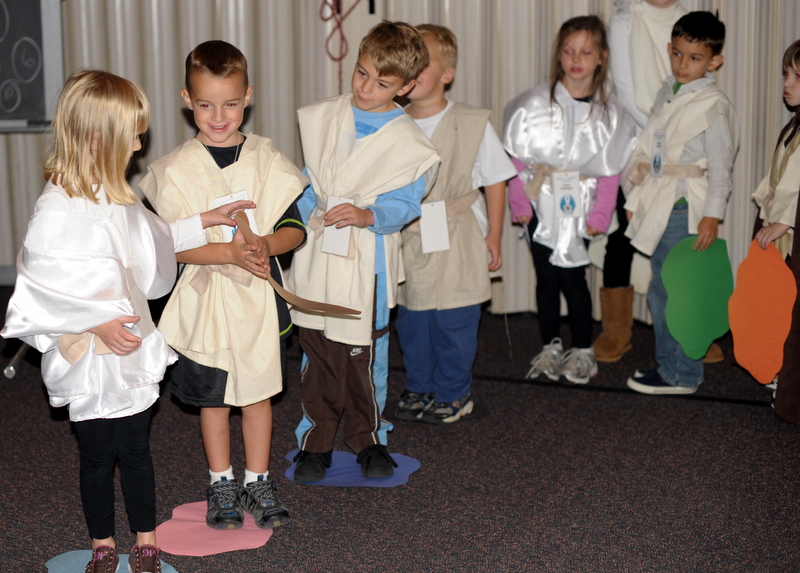
I also made tunics for all the kids. I used earth tone colors and muslin. 1.5 yards of 44 inch fabric cut in half length-wise. Then I cut out a line across the center for their heads, and a line down from the very center of that slit down about 4 inches toward the chest. I folded the fabric back and sewed it. Now there is a v-neck. I also folded the outside edges toward the right side of the fabric and sewed them to keep the fabric from fraying. The front and back edges were sewn under. When put on the kids, the edges were folded to the center front to look like there was another layer of clothing. The belts were made with fleece cut in 2 inch strips.

I made the girls tunics out of white satin to look like Jedi Princesses, but the fabric kept slipping. I suggest against using satin if you make them in the same fashion that I did. It would work fine if you sewed the fabric over, or pinned it.
Food:
We started with a grand buffet of force-fortified foods. We used blue and green food for the light side, red and orange for the dark side. They also all had Padawan pizza.

Yoda....eating a mini lightsaber made with Pirouline cookies dipped in blue Wilton's candy coating, then in blue sprinkles. I also made dark side sabers in red.


We made Yoda Soda- green Hawaiian punch with lemon lime soda.

.
And of course we had the R2D2 cake. I didn't want to put candles on R2 so as a last minute decision, I stuck them in large marshmallows. :)

Party.
Each step of the party had them learn a new skill and there was usually a new tool to go with it.
Training began with some team building activities. The Padawans carried this atomic ball across the room without dropping it. (My husband cut a piece of particle board in a circle with a circle in the middle. He painted it and put holes in it for the ropes. The 'atomic ball' is a hamster ball with cotton batting and a flashing light from a toy.

They had to lift together keeping it steady or the ball would fall off.

Then they did problem solving to cross Yoda's swamp on some space rocks. We simply used construction paper cut in rock-like shapes. They had one more rock than people, so they had to pass the last rock up to the front of the line, then step forward, then repeat. They did this all the way across the room.
They used the force to lift these meteorites. Foil covered newspaper with fishing line hooked to them. At first they didn't see the fishing line, and really thought they were lifting it!!

Jedi has had a bit of practice.

Now the fun tools.
They learned how to use thermal detonators. They LOVED them. These were nubby balls with flashing lights I picked up from Party City. They threw them at a chalkboard with a target on it.

Blasters training came next.We picked up an off brand Nerf-like gun for each child. They came in a three pack at Target.

Light sabers! They were each allowed to choose their saber. My husband gave them some safety rules for these and the guns.

I have not photographic evidence of the last part. They had a maze to go through and were able to use their blasters, detonators and sabers as they made their way toward a power core. It was made from a clear soda bottle with more cotton and flashing toys in it. I think it was a flashing wand...
They had to work in pairs to get to the power core and knock it down to destroy the death star.
After that, everyone went home!! So that's our party.


