My Little Miss turned one this month and we threw her a Royal Ball!
Before you give me too much credit for creativity, you must know that most of my creative genius lies in my ability to scour the Internet for ideas, and put them together in a cohesive fashion.
I sent out Royal invitations asking all the little Lord's and Ladies to arrive in style. (and had fun using my wax seal) I couldn't find printed paper that I was in love with, so I used some pretty paper with crowns on it, and added vellum. I hand delivered the invitations.


I also included a note for the parents that was written from their child's "Fairy Godmother". It included more information on the party, including what they needed to bring, how they should dress, etc.
I borrowed an idea for a birthday banner from http://paperflowers1.blogspot.com/2009/01/homemade-birthday-banner.html. It reminded me of royal banners. I printed the letters on regular paper in the color I wanted and cut them out. I used 12x12 paper for the pink- cut into fourths. The green printed paper is also 12x12, and cut into an 8x12 size. I folded the top back about 1 1/2 inches and used double stick tape to attach it to a 1 inch ribbon. I didn't cut the ribbon to begin with. I attached it to a few chairs as I taped each piece onto it, then spread them out how I liked them and then adjusted the length of the ribbon. The banner pieces stayed in place just fine.
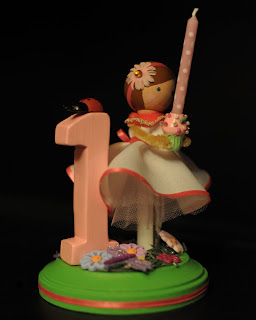
I wanted a personalized cake topper- and not just a candle. So I spend a few days making this cutie patootie topper. I borrowed ideas from here http://www.etsy.com/view_listing.php?listing_id=31584205 and here http://homemadebyjill.blogspot.com/2009/10/all-partied-out.html. (I frequent Jill's site. Love her!)
The finishing touches!!
I absolutely loved these tissue paper pom poms....inspired of course by Martha Stewart http://www.marthastewartweddings.com/article/pom-poms-and-luminarias. I made mine with 10 sheets of tissue paper to make them more full.

To add more whimsy...I thought paper pinwheels would be fun. We made these a few years back for an activity, and I immediately thought of them for our buffet table.
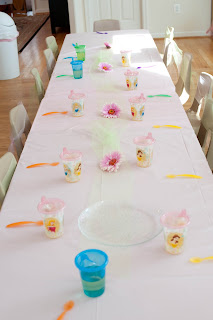
I borrowed two tables from our church nursery, along with little chairs for the little ones to sit at. There was enough room that mom's or dad's could sit with them. Each guest was also given a sippy cup with apple juice in it, which they took home.
That covers the decorations!
~On to the party~
Most baby's take a morning and afternoon nap, so I decided to have our party be a luncheon and held it at noon, a time when most baby's would normally be awake.
Because I would be hosting a lot of little ones that were under the age of two, as well as adults, I wanted to be sure there would be food that all ages and stages could eat. One way to guarantee that there would be something for everyone was to offer normal baby snacks, such as Cheerios.
I wanted a way to serve them that was fun and creative. I ran across this site http://theparteaplanner.blogspot.com/2007/10/isabelles-first-birthday-party.html and thought she had a great idea! This is my version of it.
I served fresh fruit, including bananas cut in half in their skin, all natural apple sauce, and Colby-jack cheese cut into little flower shapes a little bigger than Cherrios.

I also offered turkey and cheese sandwiches for the toddlers. We cut them out into flower shapes as well.

For the adults, we had a veggie tray, chicken salad sandwiches, and Chinese chicken salad served on mini croissants.


And M&M's. I bought the Valentine bags after Valentines day when they were clearanced, and had my boys separate all the red ones from the pinks and white.

Little Miss had her own cake. I used whipped cream frosting and strawberry cake- since I didn't want her to slip in to a chocolate coma with her first taste of REAL sugar.


I also offered turkey and cheese sandwiches for the toddlers. We cut them out into flower shapes as well.

For the adults, we had a veggie tray, chicken salad sandwiches, and Chinese chicken salad served on mini croissants.


And M&M's. I bought the Valentine bags after Valentines day when they were clearanced, and had my boys separate all the red ones from the pinks and white.

Little Miss had her own cake. I used whipped cream frosting and strawberry cake- since I didn't want her to slip in to a chocolate coma with her first taste of REAL sugar.

I made banana bread mini muffins for the under one set, with a low-sugar cream cheese frosting.
I saw these on Bakerella's website and just couldn't resist!
http://www.bakerella.com/make-your-cupcakes-pop/


I hesitated at first with the idea of serving them to the rest of the guests, who would be adults. But they were a hit. I made 60 of them, and there were only about 26 adults there. Most of them had two each.


I hesitated at first with the idea of serving them to the rest of the guests, who would be adults. But they were a hit. I made 60 of them, and there were only about 26 adults there. Most of them had two each.
They are very time consuming to make, but I think they are well worth it. You can make them several days before your event, because the candy coating keeps the cake moist. I made mine the day before, but did a practice run a few weeks before the party- and a week went by before one of the cupcakes were eaten (weird..in MY household??) and it was really moist and fresh.
As the guests arrived, they were invited to play with toys in the family room. We set up our little tea party table and two chairs off in our morning room where we took individual pictures of each child with Krisha. Those will be included in the thank you cards.

We ate lunch about 15 minutes into the party- allowing a little time for guests to arrive. Little tummy's were growling already
The baby's all finished eating at different times (and some never left the table), so they went back to play for a while. Meanwhile, we finished up the pictures with Little Miss, and all the adults just visited with each other.
We then gathered back at the table to sing happy birthday and eat dessert! While everyone was busy eating cake, the family room was turned into a Ball Room!

We filled it with 18 inch balls from Target. Each guest took one home with them.
We did a group photo of all the little lords and ladies...which was a feat! There were eleven in all.
It turned out quite precious!
We don't open gifts at birthday parties at our house to avoid issues with sharing and reclaiming brought gifts. But Little Miss had a great time opening them later.

Happy Birthday Little Miss!


